


How To Photograph Hummingbirds 2 of 2 (With Flash)
This blog article is the second of two:
- How to shoot hummingbirds in natural light without a flash (click here to go there)
- How to shoot hummingbirds with flash (This blog piece)
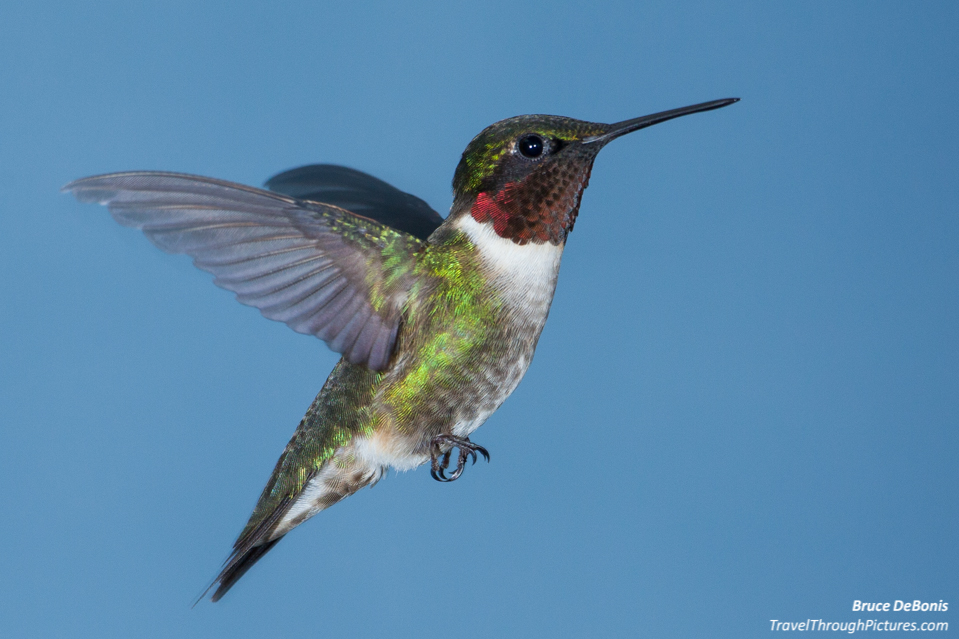
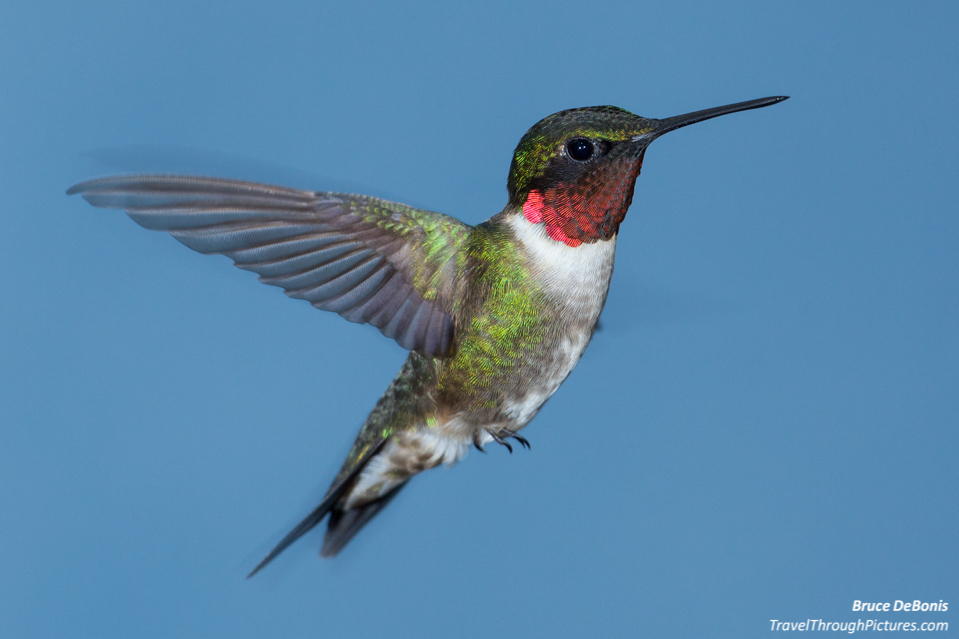
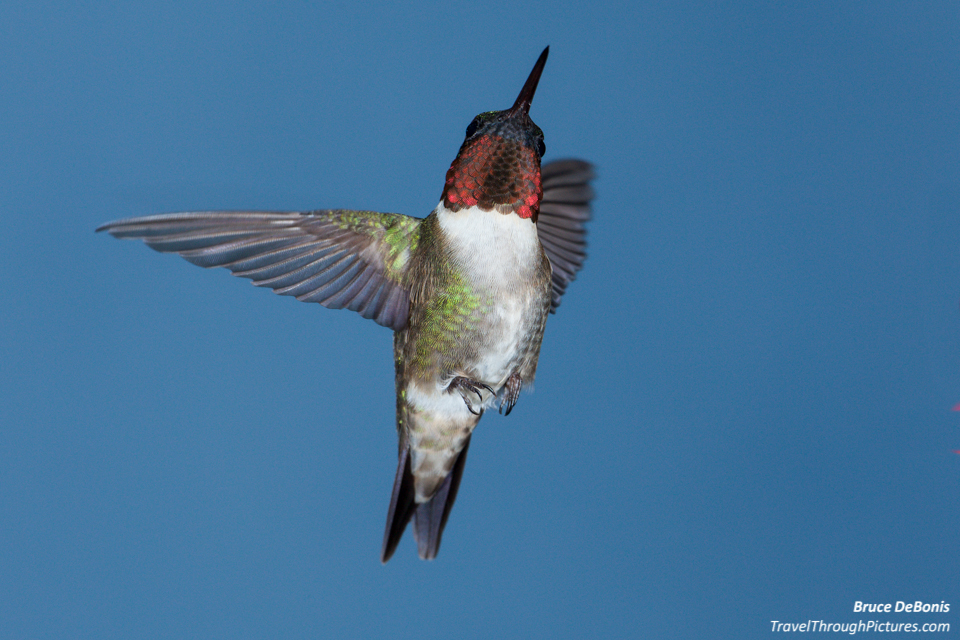
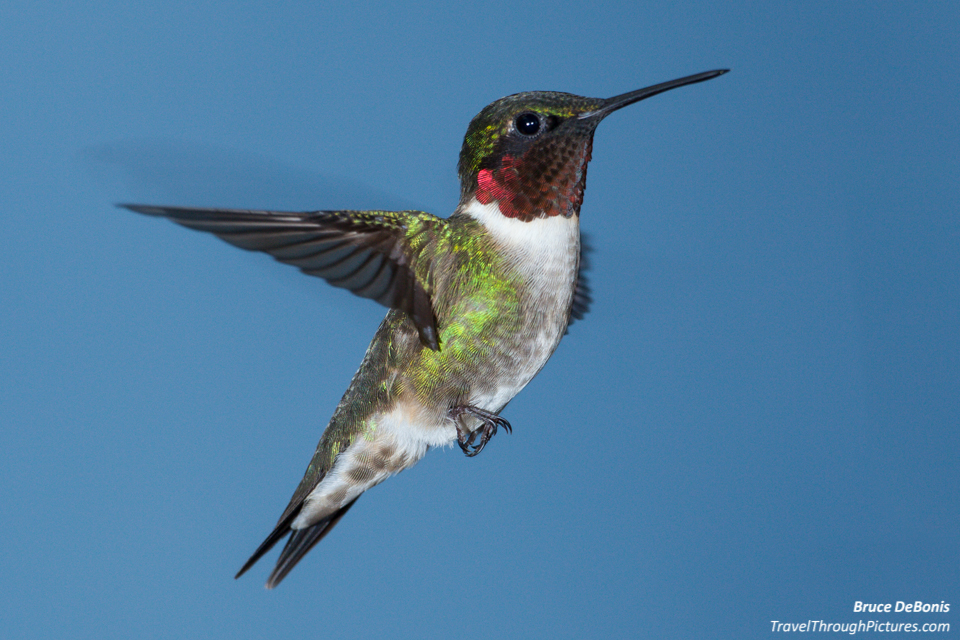
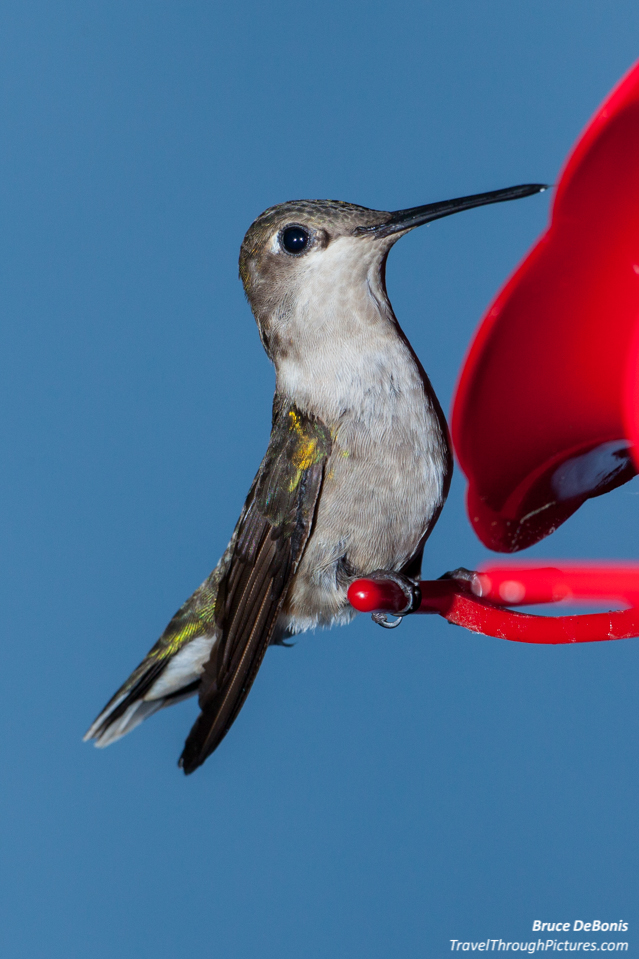
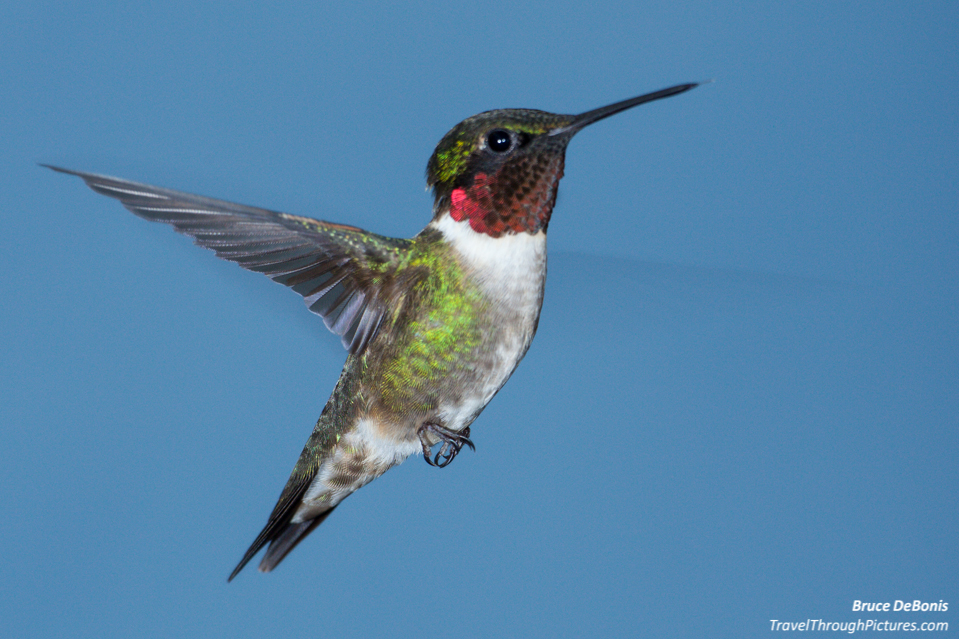
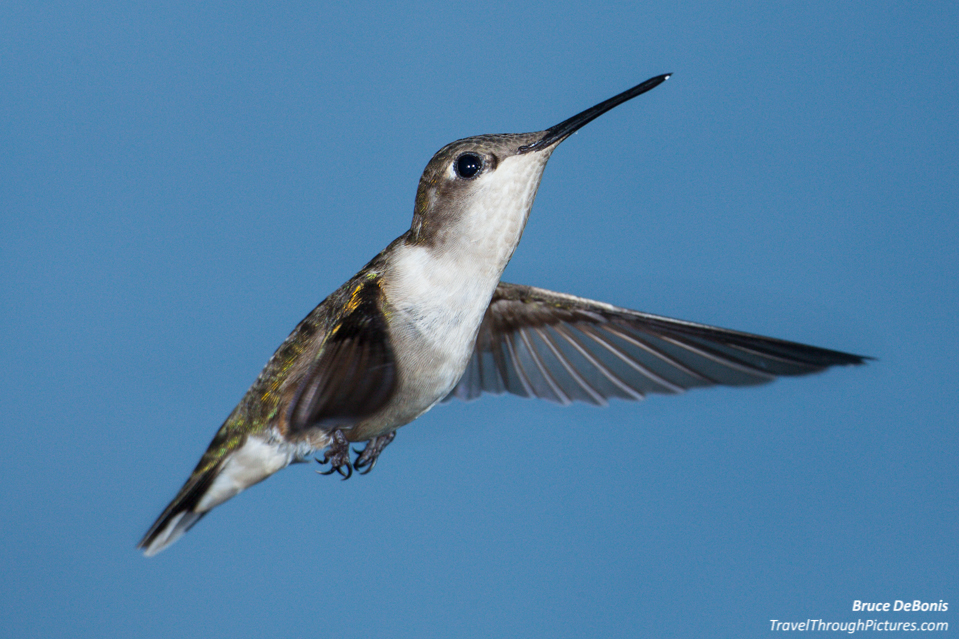
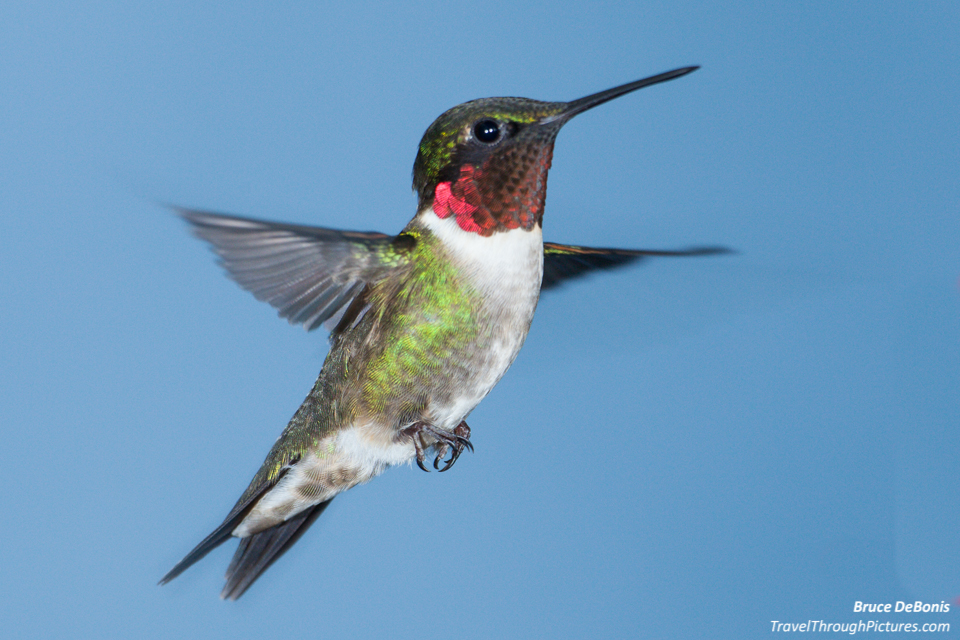
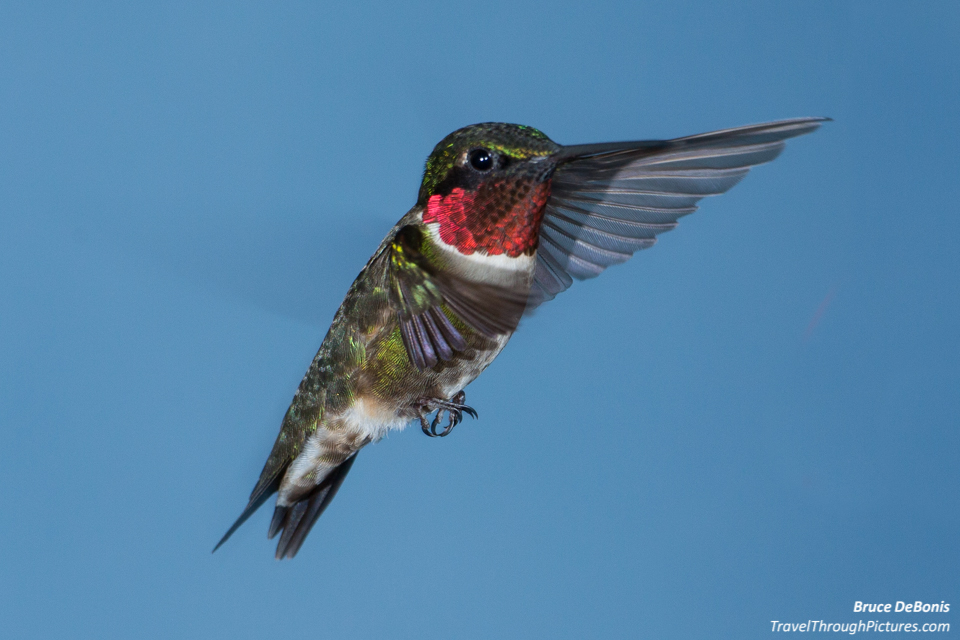
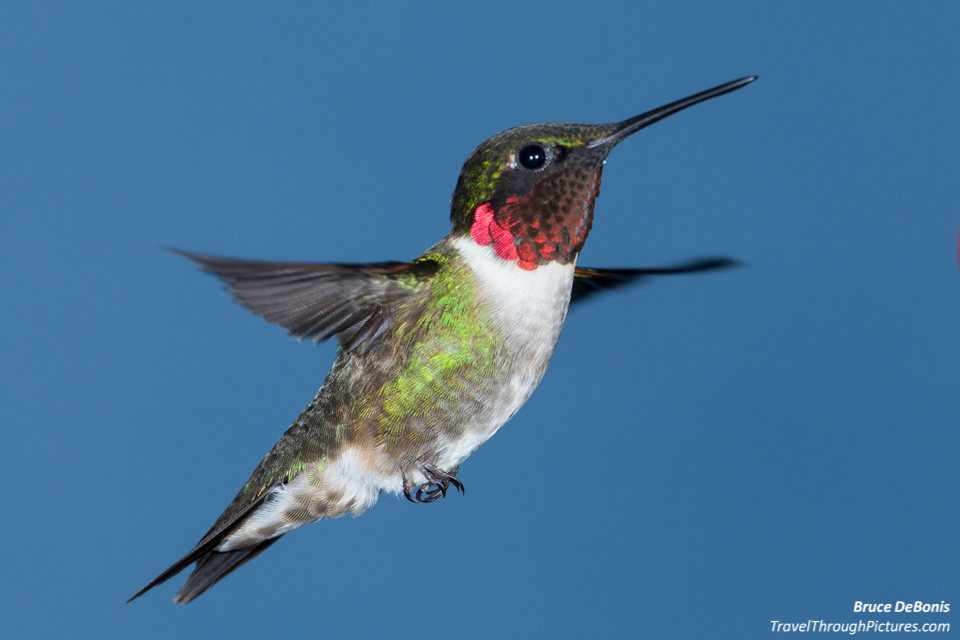
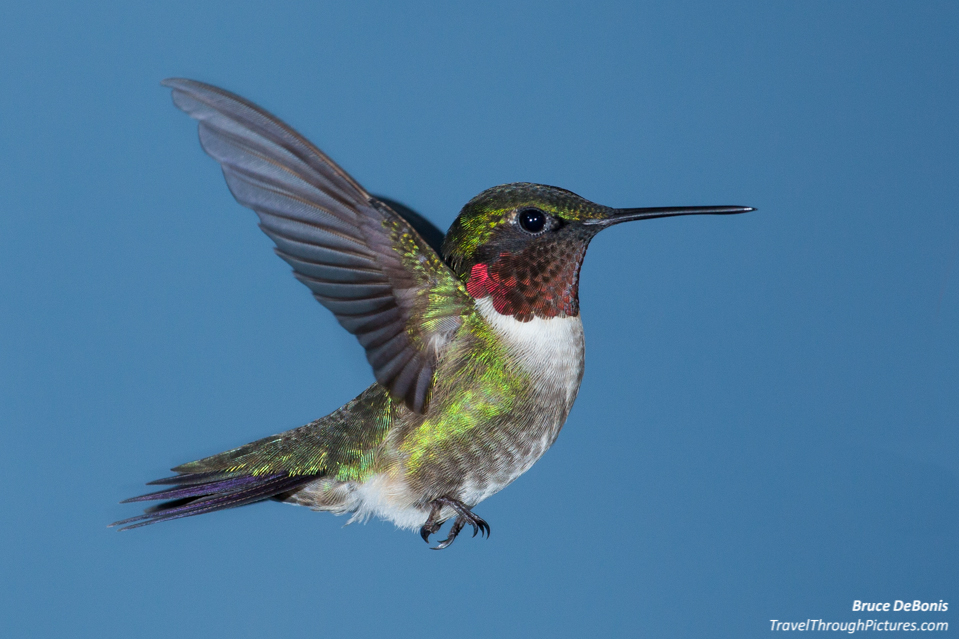
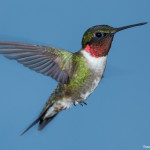
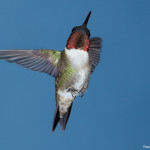
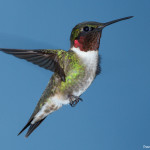
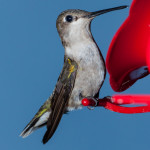
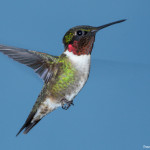
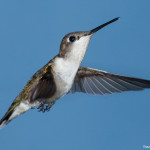
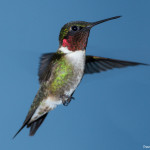
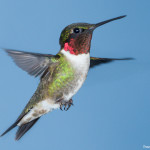
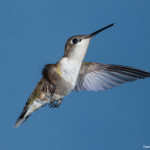
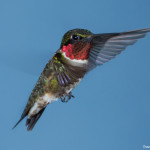
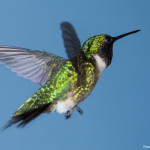
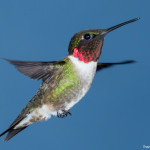
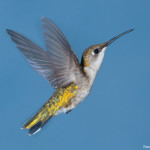
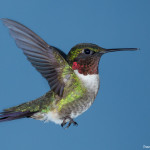
I didn’t just shoot these hummers, I BLASTED them! Yeah, I BLASTED these buggers with a double barreled dose of flash. If you want to freeze the wings, get this detail, and impress the chicks (the human kind), you need to shoot hummingbirds with a flash. I used two flash units, but you can do it with one.
In this blog piece, I give you the ammo you need to blast these hummers into oblivion (or at least into your memory card). As it turns out, it is easy to get pictures of hummingbirds like this but you have to plan, follow my instructions, maybe buy some gadgets, and just do it. Do your planning, gather your equipment and props, then set aside at least five hours for setup and shooting. I will admit shooting hummingbirds with a flash is a bit advanced, but give it a try; it is a ton o’ fun as you blast these buggers with photons.
While I try to give you some rational behind this stuff, if you just skip down to the SETTINGS section and use my recommendations, duplicate what you see in my setup, you will get pictures like I nailed here.
Hummingbirds – To freeze or not to freeze the wings
If you want to freeze hummingbird wings, you have to use a flash. Period. Here is why: Using a flash is just like using a high-speed shutter. Think of the days you went fishing in those awful discos where the thumping would have you barfing up your sloe-gin fizz just when you were dishing out your best moves. Remember those strobe lights that froze the dance floor spasms? Well, they were nothing more than flash guns like your camera flash. Camera flashes work the same way, they freeze the action with very short bursts of light.
Why not use natural sun light and a fast shutter? Well you can’t do it. For one thing, most consumer camera shutters are just not fast enough with their maximum of around 1/4000. On top of that, there is not enough natural light to use your fastest shutter speed along with a slightly closed down aperture for focus sharpness, or a reasonable ISO setting for good picture quality. Sorry, you are going to need to totally re-think shooting a hummingbird if you want to freeze the wings.
If you want to shoot with natural light, then do so. The results can be great but produce very different results than flash photography. Click here for my blog piece on shooting hummingbirds with natural light.
What shutter speed do you need? – How fast are a hummer’s wings?
After consulting the oracle of oracles, The Google, I found the estimates for hummer wing speed range from 55 to 75 beats per second!!! Yikes! That is fast! I hate math but I am sure someone out there can do the calculations to translate this to an actual required shutter speed, but I will tell you this simple short-hand answer: As fast as you can.
I shot these at about 1/6500 and still got some blurring. Even this was not fast enough. As I noted already, you can get these simulated shutter speeds using a flash. Technically, you can get much faster speeds with a flash but you will see it is really tough to go faster due to the physical limitations of flash placement and other issues with your “home studio”.
How a Flash Actually Works – Power is not about brightness
First, there is a big misunderstanding about how a flash works and what is commonly called flash power. While one flash model may fire brighter than another, stopping action is not about how bright the flash fires… it is all about how long it stays on. Flashes always fire at full power, but the variable is when they turn off.
A flash, even at full power (actually full time), is still very fast and a very short burst of light. It appears to be a long burn, but that is an illusion because your eyes are overloaded and left with the flash imprint until your retina recovers. How fast is a full power discharge? Well, that depends on the make and model of your flash. Unfortunately, Canon does not publish their flash power times but the geeks on the internet publish this stuff for you. Why Canon doesn’t publish this stuff is a mystery to me, but the data you need is easily found with a few clicks.
 There are blogs and websites that publish flash power / timings and as is typical, not all are in agreement. Oh well, at least they were similar. I used the numbers from a website called www.speedlights.net where you can read more about flashes than you would want to know. They published the following for my Canon 580 EXII (a top of the line, discontinued pro model I purchased used over the ‘net):
Which speed to use? As I noted earlier, as fast you can. You must get the flash close to the bird, and then adjust exposures. This will drive what power you can get away with. I settled on 1/16 power that yielded an effective shutter equivalent of 1/6500 second. If you use my setup recommendations and equipment distances, use 1/16 power.
A technical note about the above timings…. one of the reasons the timings published on the ‘net differ from each other has to do with the testing methodology. I won’t go into it much but it has to do with the flash decay… when to declare the flash “off”. The method above is a t0.1 methodology and this yields timings that are longer than other methods. Note the difference between Canon’s own spec for full power and this tester’s results. In other words, I probably got way faster shutters than published above…. whatever.
The Hummingbird Studio – This is the most important thing of all!!!
Here is a list of issues with a short rational:
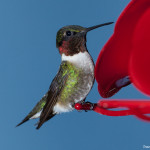
- A Bird feeder – Locate the feeder in the shade and where the hummers feel comfortable going
- A flash or two – Located off of your camera on a tripod or flash stand located very close to where the bird will be floating
- A flash stand or two
- A flash triggering system – Your flash is off-camera so you need a method to fire it.
- A tripod for your camera – I just can’t hold a camera steady enough or up to my face for as long as it takes to snap hummer photos.
- A background – I used a blue, featureless blanket that has the dual focusing advantages of being ignored by your camera and will allow the bird to stand out for better and faster focus lock.
- A zoom lens – I shot these with my 500mm but any zoom will do.
- A ton of patients as you will have to sit motionless
- Birds
Put the feeder up a week or so before shooting and locate it where it will be for the shoot. The birds learn where to find the feeder. Hummers are more likely to use a feeder if it is near bushes where they feel safe. Stake out where you will sit, what background you will use and make sure the feeder is in shadow as you want the flashes to do the work and not the sun.


Put the Feeder in Shadow – Too much light attracts ghosts
Your shutter speed will be about 1/200 so even when you flash shuts off, you will still be exposing your sensor. If there is too much ambient light, the sensor will continue to record an image. This will result in dusty images around the wings called ghosts. These ghosts are actually lowly exposed wing blur. The darker the ambient light, the less ghosting. I placed my feeder under a roof overhang and shot on a cloudy, rainy day so I had little ghosting. Sometimes the sun came out and left a ghost or two on my shots above.
How much ambient light you have is irrelevant for a bright or dark photo as the flash dominates the exposure on the birds.
Get the flashes close to the bird – Closer = more light = lower power = faster shutter
With light brightness, closer is more. Actually way more than you would think. The inverse square law applies here and it says that ½ closer is equal to 4X the light. In other words, you get big gains in light from small movements closer to your subject.
Two flashes or one – Either is OK!
I used two simply because I had them. When you use one, there can be some odd strange shadows especially if your flash is off-axis as is when you place the flash off camera. If you have only one flash, that is OK, just place it as close to the line of sight with your camera. It is fine if it is in your frame as you will be cropping down on the bird anyway.
Regardless of using one or two flashes, you want the flashes tucked into the camera’s line of sight to get the wonderful feather colors. The brilliant hummer colors are actually from the fine feather spines refracting light. If your flash is too much to the side, you won’t see the colors.
Why not use the flash on the camera?
Using the built in flash or a flash unit place on the camera will not work. Remember that whacky inverse square law I mentioned above? Well it works in reverse too. Double the flash distance from your target and your flash brightness drops by a factor of 4. In other words, the flash will be too dark. If you think you can just bump up the flash power, well you were not reading…. that lengthens the flash time (in effect a slower shutter) and you will blur the wings.
The Settings – My setup that worked
The birds above were snapped with the following settings. If you duplicate this, you can expect the same results. Period. Just do it and you will get the shots like I did.
- Two flashes in manual mode at 1/16th power
- Flashes set 2’ apart (I should have moved these a bit closer in for better bird color)
- Fresh flash batteries
- Flash to bird distance a bit less than 3’
- Background blanket about 6’ although farther back is better for smoothness and loss of material detail
- Camera to bird distance is 10’ with my 500mm and full frame camera; you should try 6’ to 8’ with a crop sensor camera and say a 200mm lens
- Camera set to RAW for better results editing and cropping in software
- Camera in manual mode with shutter set to max sync speed of 1/200, f/9, ISO 320 (check your manual and set your shutter for whatever is denoted as your maximum sync speed; click here for more on what is sync speed)
- Focus point center only but try all or center group (my 5D MkII seems to only work well on center point only)
- Camera wrapped in big towel to muffle shutter noise
The Variables – You may have to adjust
You may have to deviate from my above settings so try and snap a few of the feeder without the bird. If too dark, try doing the following in this order:
- Move the flashes closer to the bird
- Increase flash power (try not go less than 1/5000 second power equivalent)
- Open your aperture to a smaller f/number
- Increase your ISO
- Do not touch shutter speed
If you picture is too bright, you are lucky so try the following with none being the priority:
- Lower your flash power – this will also super freeze the wings
- Lower your ISO – this will improve picture quality
- Stop down your aperture to a higher f/number – this will increase depth of field and improve the odds of getting good focus
That’s it!! As if that was not enough to chew on eh? Below I go into some more, less important detail.
500mm Lens – Tricks for focus
You do NOT need a long lens like this to shoot hummingbirds. I used my 500mm lens for a few reasons: The first was simply because I have one. If you are fortunate enough to be swinging this massive log of Japanese lumber, you would use it too! The other and more important reason to use this lens is its ability to set a focus limiting range. By setting a switch on the side of this lens, I can limit its focus range to stay within a 5.5 meter range. This speeds focus lock and limits focus hunting.
The downside to using this range limiting feature is that to keep the bird within this focus range, I had to move the camera farther away from the feeder than I wanted. So, I used stacked extension tubes between the lens and camera to shorten the focus range and move the camera closer to the feeder. By installing both my 12mm and 25mm tubes, I was able to put the feeder in the center of the focus limit range but keep the background just beyond its far limit. This was simply technical cool and I know for a fact, chicks dig this brainy maneuver. I can’t wait to tell this story while sluggin’ down beer in a bar surrounded by a clutch of lonely divorcees. (Hey! Geeks have dreams too!)
My Two Flashes Were Different – Had to compensate
I have a Canon 580 EX II and a Canon 430 EX flash. Each has a different power range so I had to compensate a bit. The 430’s flash was not only less bright than the 580 but according to www.speedlights.net, the flash time at 1/16 was longer. This was really annoying to say the least. I compensated for this by altering the 430’s distance and used flash exposure compensation to change the power/time. Did I do it correctly? I dunno. This was getting just too complicated for me so I guessed. I think it worked.
Quick tips: If you use multiple flashes, use the same make and model if you can as it makes calculating power and distance a whole bunch easier to do. Before you buy, make sure someone tested and published the flash durations for the model you are considering.
Since you will be using the flashes in manual mode, you don’t need sophisticated flashes or even of the same make from your camera. You just have to know the flash durations for each of its power settings.
Remote Flash Triggering
To trigger my off-camera flash, I used a cool, cheapo $40 gizmo called “EzFoto Grouping Componor Combined E-TTL II Off-camera Cable for Canon Camera and Flashes” from Amazon (that was its name at Amazon!). The brand is either EzFoto or Pixel and it is a small, Chinese made control unit that you put on your camera’s hot shoe, and then another receiver-unit under your flash. These two units are connected by a standard computer network Ethernet cable. If you buy additional receivers, the system can handle three flashes. Cool.
To fire the second flash, I had a choice. I could use another receiver unit under that flash with a second cable or use, as I did here, Canon’s own flash-to-flash communication system. I put the 580 into “Master” mode and the 430 into “Slave” mode and the two communicate via light. Pretty cool.
White Balance – For color accuracy
I used a my ColorChecker Passport to ensure color accuracy. My camera and flashes each have a slight color tilt and by shooting this panel, I can correct for color imbalance in software later. You don’t need this cool tool, but use a simple, cheap gray card available at any camera store.
Before WB adjustment (as shot), and after WB adjustment in Lightroom 5:


The Equipment:
- Canon 5D MkII
- Canon 500mm L f/4.0 IS
- Canon EF 12 II and 25 II extension tubes
- Canon Speedlight 580 EXII
- Canon Speedlight 430 EX
- EzFoto/Pixel Ethernet Flash Triggers with Ethernet cable
- Manfrotto 190 CXPRO4 tripod
- Manfrotto 222 pistola head
- Gitzo 3530LS carbon fiber tripod
- Wimberley II gimbal head
- No-name tripod from the 1950s
- Blue blanket clipped to a broom handle
- Towel to wrap around camera
- Droll Yankee hummingbird feeder
- LightRoom 5
- ColorChecker Passport
- Serious genetic deficiency that drives me to enjoy doing this stuff

