A Starting Point for Learning
I am going to get serious here for a moment. No beer for the duration of this post. The purpose of this article is to give you a starting point for taking your camera off of Automatic, and getting you on your way to taking purposeful, artful pictures. You can’t do this on Automatic; you must take control of your camera. The good news is it is not difficult and if you use my approach, you will have a base for learning and a framework to approach most shooting situations.
First and above all else, always start with your camera with the exact same settings each time. Below I give you the magic settings to tackle the technical aspects of taking a picture and how the heck to set up your camera.
Click Here to Download the Magic Settings!
Reasons for always starting with the same camera settings:
- Provides a starting point for learning
- The camera is ready to take a picture without a change most of the time
- You need only change one or two settings at most to adapt to conditions or accomplish art
- Easy
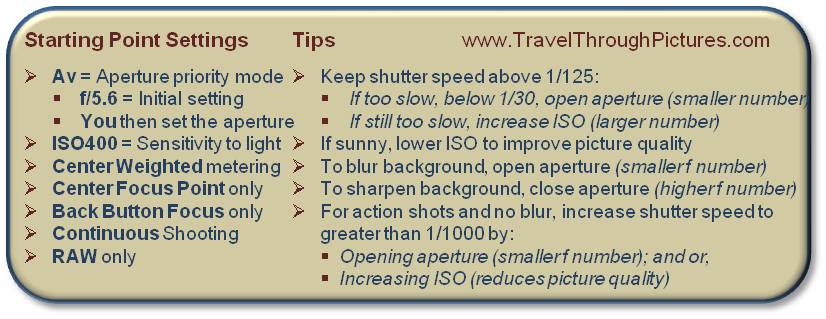
The magic settings – always start using your camera in this state:
- AV– Aperture priority mode, the camera sets the shutter speed for you
- f/5.6 Aperture – initial setting, sets how much light the lens lets in
- You set the aperture depending on what you want to do
- ISO 400 – sensitivity to light and image quality
- Center Weighted Metering – how the camera calculates shutter speed
- Center Focus Point Only – The most important and usually the most technically sophisticated point in your camera
- Back Button Focus – Focus is accomplished by pressing a button on the camera back and not the shutter button
- Continuous Shooting – Hold the shutter down for multiple shots
- RAW only – Convert to JPG in your software later
I save these settings as a “user setting” on my Canon camera and can recall this configuration at any time by spinning my mode dial to C3. I chose C3 because it is at the far end of the dial and I can spin it to where it stops, all without looking.
How to use these settings – General Shooting Tips – Memorize These Five Bullets
- Keep shutter speed above 1/125 to prevent shake and blur:
- If too slow, below 1/30, open the aperture to a smaller f number
- If still too slow, increase ISO to a higher number, but this reduces picture quality
- If sunny or bright, lower ISO to 200 or 100 to improved picture quality
- To blur the background and make art, open the aperture all the way to a smaller f number
- To sharpen background, close aperture to a higher f number, then check shutter speed
- For action shots with no blur, increase shutter speed to greater than 1/1000 by:
- Opening aperture to a smaller f number; and or,
- Increasing ISO to a higher number (this reduces picture quality)
As you learn the steps above, you will see that to take most pictures, you will only need to change one, or rarely, two settings of your camera.
That is it!!! If you set your camera up and follow the settings as I described above, you are ready to start making great art. Wow……
My Approach to Learning: Always start your camera with the same settings
I call this Starting Point Learning and I fully expect to win a Nobel Prize for it. I believe it is near impossible for you to learn how to take great pictures by learning photographic definitions and the technical functions of your camera. Stuffing your head with facts and then expecting to know when and how to apply these random facts is impossible. No one is this smart. If you are confused by your camera manual or that friend of yours that barks out orders telling you what to do, you are not alone. I recommend that you first lose your friend, and then take my advice and always start out with your camera set to the same settings. It is from this point that you will learn what to do and how to do it.
Early on when I purchased my first DSLR, I read my manual cover-to-cover, read a bunch of blogs on the internet, and then headed out to take my first Pulitzer Prize of a picture. And wouldn’t you know it, a big buck with a full, magnificent rack darted out in front of me. I froze. I freaked. I panicked. I couldn’t turn on the camera! DepthofFieldsh utterspeeda pertureISOfoc uspointssmodes shakenorstirred ARGHA!!!! I froze. Did the buck dart off? No! He turned around, called to his friends with some odd snorts, and about seven more bucks appeared out of nowhere and they all started to laugh at me. They shot me the moon…. flipped me off with a hoof…. Oh the humiliation.
Now many many folks say I am all wrong about trying to figure out the technical stuff of camera technology, and I should just use these wonderful automatic features and worry about composing the picture and having more fun. If I did, they would argue, I would have pics of that grand buck. But, I assure you that if you want to really learn how to take great pictures, you need to learn about and understand your technology. And, I suspect, that if you are actually reading this drivel, you enjoy understanding technology. There is nothing wrong with this and the technology is a legitimate part of enjoying photography.
Even years after I figured out the technical basics of camera technology and taking pictures, I still use a consistent starting point for shooting. My starting points have changed as I progressed, but I still practice what I preach. My brain is wired this way now, and it expects to only change one or two settings at the most to adjust for conditions such as bright light, or what I want to do such as take pictures of flowers and blur the background. Even if I see that flea-bitten, rotten, rat of a buck again, these start-up settings are most likely good enough for me to get the shot without changing a thing.
My Rational for These Settings
First, caveats about my starting point settings and my rational. There is no perfect place to start from. If there was, all cameras would be set up that way. A sports shooter may want his or her starting place to favor a fast shutter speed to freeze the action; a landscape photographer may favor matrix/evaluative metering to cover the full frame and use a narrow aperture for depth sharpness; and, a flower shooter may favor low ISO for high image quality and a wide aperture for an arty shallow depth of field. What is important is that you set up your camera in a way that you understand and shoot from there. I am very committed to my belief that learning comes from a common starting point so if you don’t like or agree with my starting points, then use your own. And above all, be consistent.
I favored a few characteristics when I chose these settings. The first is having near-complete and simplified control over the camera. That is why I turn off most of my camera’s automatic functions such as focusing points. The second is consistency of camera operation in that the camera will always behave in a consistent manner and that is one of the reasons I don’t like matrix/evaluative metering. Both fancy focusing and matrix/evaluative metering systems use algorithms developed by engineers trying to make your life simple. However, I could never figure out what the heck they are doing or how the camera is going to behave and then, later when I am reviewing my pictures, I can’t develop a strategy for improving them. I fully accept others disagreement with what settings I chose and my rational for it but again, I still believe strongly in starting out with the same settings every time you fire up your camera.
AV Aperture Priority Mode – For folks who try to make art with their cameras, this is the most important setting and the most difficult to understand in my opinion. The lens aperture determines how much light is let into the camera when you press the shutter. AV mode requires you to set the aperture, or f/stop, and the camera will then figure out the appropriate shutter speed by using the camera metering system.
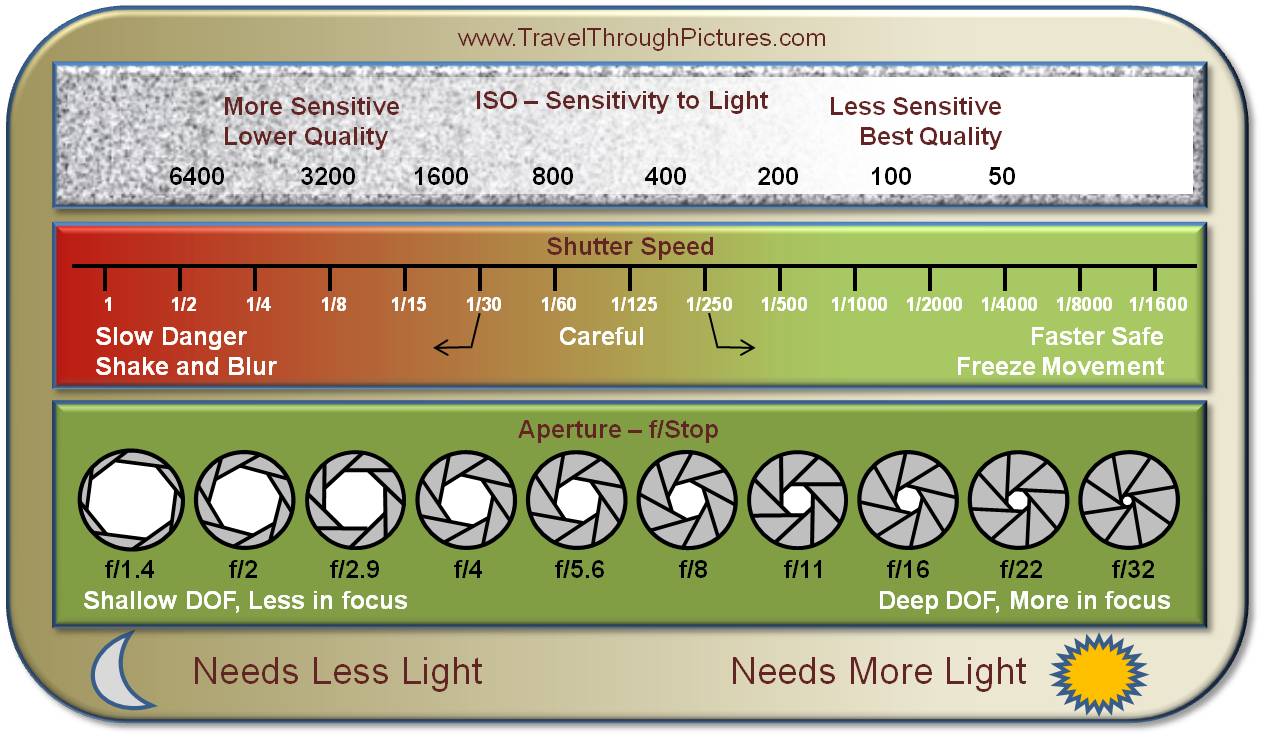
Aperture settings are the most important aspect of arty photos as it gives you control to blur the background or not. Now I admit it, understanding aperture gets confusing here because lens apertures are denoted as f/stop numbers, and smaller numbers mean wider apertures and more light let in. Just accept it. Memorize it. I’m sorry about it. Smaller f/stop number = wider aperture = more light let in = shallow depth of field. Remember, wider apertures (smaller f/stop numbers) means the lens will let in more light. With more light, the camera will calculate a faster shutter speed. Smaller apertures (larger f/stop numbers) will let in less light and require the camera to slow the shutter speed to compensate.
Re-read the prior paragraph over and over and you will understand 99% of the technical stuff you will need. This is the most difficult stuff to grasp.
f/5.6 Aperture – This is a great starting point for aperture. If you panic, you can fire up your camera and just shoot with this aperture as it is open enough that you most likely will get the shot. f/5.6 is or is near you widest aperture and works in most situations.
Another quick tip about aperture is that all lenses perform their worst, or least sharp, at their extremes. Keeping your aperture a few clicks from either extreme, wide open or closed down, will get your lens to perform at its best.
You set the aperture – This is what you must do before you take your picture and the most important aspect of your control over the artiness and hence quality of your photograph. Even if you want to speed up the shutter for action, you open the aperture to let in more light and camera will then speed up the shutter. If this is not enough shutter speed, then you set the ISO to a higher number and the shutter speed will move up even further.
Composition and capturing light are arguably more critical for making a great image, but don’t have much to do with the camera settings and this article is all about camera settings. You decide if you want to blur the background as when taking a picture of a flower and therefore open the aperture (smaller f/stop). If you are taking pictures of groups of people or scenery, you probably want everything in focus, therefore you “stop down”, or make smaller the aperture (larger f/stop). If there is action such as sports, then you want a faster shutter speed to freeze the action. To do this, you open the aperture (smaller f/stop) to let in more light, and camera will compensate by speeding up the shutter speed. The other two major settings, shutter speed and ISO should follow from what you want to do with Aperture. Click here to read my article using aperture and depth of field to make art.
ISO 400 – ISO is your camera’s sensitivity to light. A higher ISO means that your camera needs less light and will calculate faster shutter speeds. It also means you be able to shoot without a flash in lower-light situations. So why not crank up the ISO to a super high number and stop worrying about the light? Well, there is no free lunch and picture quality suffers. It suffers in two ways: 1) increased noise and grain, and, 2) something I can’t explain… the pics just don’t look as good to me.
If you have good light, you should try and reduce your ISO down to 100. I think 200 is actually the best setting because I have a really hard time telling the difference between 100 and 200 but can see degradation at 400 with my Canon 5D Mk II. I will go to 800, but no higher as I think the picture quality really suffers beyond this. If you feel your pictures are noisy at 400, then change your starting setup to ISO 200. I chose ISO 400 for beginners because it will result in less problems and choices when taking pictures. I actually keep my starting point at ISO 200 as I favor picture quality as a priority.
I don’t like auto-ISO because it is harder to learn your camera when the camera is doing things for reasons you don’t understand. You can set your camera to this feature, but when you look back on your pictures and try to understand what happened, auto-anything makes this understanding more difficult.
I have expressed my concern about ISO to some pros I met out shooting in the field and they disagree with me. They consistently tell me that if you get the exposure correct, you can push your ISO up much farther and still get fantastic results. But, getting perfect exposure is really tough and one of the many things that make a pro a pro but the purpose of my instructions here are to help beginners. I feel that these settings I chose as a starting point will really get you going and taking great pictures. If you disagree, that is OK, just be consistent with your chosen starting point.
Center Weighted Metering – This may seem controversial to some as most may expect to use the sophisticated matrix/evaluative metering in their cameras, but I have found that it is difficult to predict how your camera will behave in this mode. If you use my recommendations for using only the center focus point, most of you subjects will be towards the center of the frame therefore metering bias towards this point will work the best for you. If you disagree with this, then set your camera to Matrix/Evaluative or whatever else your manufacture calls their whole-frame metering system. I will say, that when shooting birds or flowers or anything else where you subjects tend to be in the center of the frame, center weighted metering may work better for you as it does for me. I have found that predicting what the camera will do is very important to getting good exposures. Unfortunately, it is tough to predict how the engineers set up their matrix systems and therefore tough to predict how the camera will react, especially when faced with complex lighting situations such as high contrast scenes or when in the presence of a bright light like the sun. Learning then becomes difficult. It is easier to predict what the camera will do in any metering mode other than matrix.
Center Focus Point Only – While camera manufactures and bloggers continue to demand more sophisticated focus systems, I am going the other way. Keep it simple. I found the easiest way to learn your camera is to limit the number of variables your brain has to process. Just turn off all that automatic stuff and just activate the center focus point. You can do fantastic photography with just this one simple focus point. If you get proficient with your camera, by all means try out some of that wizardry you paid for, but really, you don’t need it and it just adds to the avalanche of information your brain must process. Something else you may be unaware of, but the center point in most cameras is the most sensitive and sophisticated focusing point in their camera anyway.
Back Button Focus – This is a feature that you probably have to set up from your camera’s menu system and Canon calls this a “custom function”. I recommend activating this button on the back of your camera for focus, and turn off the focusing action of your shutter button. This allows you to decouple composition from focusing and works really well when you’re using the center focus point only.
You put your center point on the item, face, or whatever you want to focus on, press the focus button on the back of the camera, let it go, and you are done. Now you can move your camera around and recompose the picture and shoot. You don’t have to worry that your camera will now refocus when you press the shutter. If you are getting arty and want to blur your background, then you care very much what is in focus and what is not and this approach will give you complete control. It will quickly become invaluable.
Continuous Shooting – I love this feature for a few reasons. First, why not have it on? If you only want one click, then press and release. If you need to, you can peel off a few shots and pick the best one, after all, electrons are free. But more importantly for me, as I noted more than a few times on my blog, that I have shaky hands, and a super talented professional photographer friend of mine, Bob Neroni in Philadelphia, gave me a wonderful tip: “If you have shaky hands, the second shot in rapid fire will always be your steadiest”. Wow…. It is true. The first shot has your finger squeezing down and maybe a slight shot of excitement as you take the picture. For the second click, your muscles and camera are all in a steadier state and not shaking. Thanks Bob!
RAW Only – I shoot only in RAW as this is the only way to get the most out of post processing on your computer. JPG is a lossy standard, meaning that data is thrown away to make a JPG and this is bad if you are going to process afterwards. Setting your camera to produce both a RAW and a JPG will slow your camera down, limit the number of shots you can take in a burst as well as fill your memory card faster so I don’t recommend it. If you don’t like post processing and spending time in front of your computer, that is fine as most software will allow bulk processing all your RAW files at once and turn them into JPGs as if they were done that way in your camera. Then, if you have one or two pics that require processing or you would like to do some cropping, you can still go back and work on just them.
I know I am going to draw fire for some of my choices or over simplifying some pretty complex stuff, but these tips are intended for beginners and are, I think, great rules of thumb for learning.
Please provide me comments and help me improve these instructions.
Below is my eye chart of all things confusing and can be downloaded with the link above. This chart is great for idle staring and a cure for sleeplessness.


